
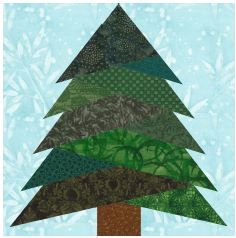
Here is the pattern I chose to make:

Why did I choose this pattern? Well, I love it! But mostly because I got a little too overconfident in my abilities after my doing so well with my first paper pieced block shown here:

No, I did not choose the Christmas version as that would have been even harder! This is my second attempt at paper piecing and although I finally did get an acceptable block in the end, I went through a ridiculous amount of ripping out stitches and would like to share what I learned to avoid that in the future!
Here is the final result:

OK, here comes the valuable stuff!
1. Many of the tutorials that I read say that when you are first learning, it will be best if you cut your pieces overly large to make sure you are going to cover the area you are trying to cover. HEED THIS ADVICE! I can't even remember how many times I had cut my pieces too small and had to rip them out because I misjudged the shape or how it would lay after sewing it on. Even when you think you're cutting them big enough, cut them just a little bit bigger still. They can be trimmed later. You will probably have a little more waste at first, but it is so worth it until you are able to get the hang of it.
2. It helps to print two patterns, one for sewing on and one to cut out the pieces and lay on the fabric you will be cutting. I think later, after I get more experienced, I won't have to do this step but it helped reduce the number of times I had to redo. IMPORTANT TIP: When you do this, cut out the piece of the pattern laying print side up but lay it on the BACK side of your fabric instead of the front. That is because your final block is going to be a mirror image of what the pattern looks like. If you cut it on the right side of the fabric, it will be wrong.
3. One of the tutorials I read, advised to sew several stitches in place before you sew your line. Do NOT do this. When you're sewing with smaller stitch lengths, it makes it nearly impossible to rip out and it isn't necessary anyway as long as you start about 1/4 inch before the line you actually need to sew. Stitches will be locked in by other seam allowances or the binding.
4. Make sure you check and double check which line you are should be sewing on. I knew which piece of the pattern I should be sewing on, but several times started sewing on the wrong side of that piece. This caused me several ripouts.
5. Check and double check that your fabric is facing the right direction before you sew. I messed this one up a lot in the beginning.
UPDATE! Since I wrote this post, Emily Leachman of the Darling Dogwood just gave me another great tip. Using solids or batiks helps eliminate this problem because they don't have a wrong or right side. Noted!
6. Last, but not least. pinning is your friend. I made the mistake several times of just holding the piece where I wanted it to be, turning over to sew on the pattern only to find out my piece had shifted before I started sewing. AAAARGH!! (My favorite quote from Charlie Brown)
For anybody that hasn't actually tried paper piecing yet, all of this will make more sense to you once you have actually tried doing it. It may sound like Greek right now, but go give it a shot!
We learn way more from our mistakes than we do our successes, don't you think? What mistake did you learn the most from?

Linking to:
Sharing Sunday's at The Creative Side
Your tree turned out very well. You'll rip less as you get the hang of things. These are all good tips, and thank you especially for tip #2! Why didn't I ever think of that?
ReplyDeleteI love how your tree turned out, Janice! It's funky and fun with so many colors and fabrics! Paper-piecing does take practice, for sure. It's so easy to make mistakes, especially getting the fabrics the right way. One mistake I've learned from (they're are many) is to hand-sew binding on the back of any project. Too many times I've told myself it will look OK when sewing by machine. It rarely turns out that way for me. Hand-sewing is the answer for me!
ReplyDeleteMy first time paper piecing I had a heck of a time working with freezer paper, it kept sliding so I just did away with it all together and "eyeballed it" and it worked out much better.
ReplyDeleteI'll have to give paper piecing another go but anything overly fussy, I get bored and/or frustrated.
Your tree turned out wonderful! I love the colors and it is so sharp and crisp. You should definitely give those dresses a try. I think you are ready. :)
ReplyDeleteIt's a beautiful block. I am not a fan of paper piecing and always screw up getting the right sized piece of fabric. I now print a second copy of the pattern and cut out the pieces to use as templates. Cut your fabric pieces (remember to include seam allowance) based on the template and you have the right size needed and you just line up the edge of the pieces to get the right seam allowance.
ReplyDeleteI love it! What a perfect little tree!
ReplyDeleteVery appropriate tips. I learned a lot from making all those Vintage Dress blocks. But I can attest, practice does make the whole process go smoother. Very cute tree!
ReplyDeleteGreat list! I must remember #2, I've never thought about printing a second pattern to check my cuts of fabrics against. Another problem I have is make sure none of the fabrics have flipped back on themselves. I get so mad when I've taken the time to make sure everything looks like it fits and everything is in place, then set the piece down on the machine to stitch and find out something doubled back and I've just sewn it to itself. I think your tree block turned out beautiful. Be very proud of it!
ReplyDelete